Thursday, January 20, 2011

RBAC Explained

RBAC is a newer technology with Exchange 2010 that seems to have a lot of IT professionals scratching their heads; especially when it comes to the terminology. First off, what is RBAC?

Role Based Access Control (RBAC) is a new permission model introduced in Exchange 2010. In the past, manually changing ACLs could cause collateral damage, and often times had longer reaching implications. For this reason, Microsoft opted to go with a model where administrators could easily allocate permissions via default or custom Role Groups. Now let’s try to decipher what this means in a way that is easier to understand.

Role Group: A Role Group is essentially a special Universal Security Group (USG) that has members and Roles assigned to it. You can actually see these in ADUC. These Role Groups are essentially used like any other kind of group; they are for standard permission allocation to a subset of users.

Predefined Role Group Example:

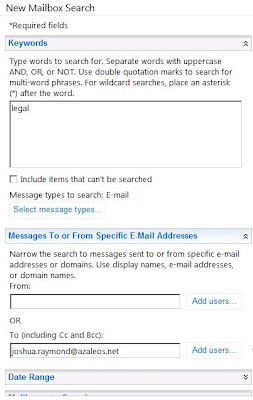
Discovery Management Role – Grants the ability to perform multi-mailbox search, and compliance exports. Encompasses the Legal Hold and Mailbox Search Roles.

Assigning a user to a Role Group:

Add-RoleGroupMember -Identity "Discovery Management" -Member

Role: A Role is basically a predefined list of Role Entities packaged up, and ready to assign to a Role Group (or directly to a user, though it is generally better to create a Custom Role Group if one does not currently exist that meets the need). By default, Exchange 2010 has 65 built-in roles.

Administrators can create child roles as well. These roles are limited by their parents by what rights they can have. Child roles cannot have more roles than the parent.

Predefined Role Example:

Mailbox Search – Contains the following permissions:

Mailbox Search

Get-ADServerSettings

Mailbox Search

Get-DomainController

Mailbox Search

Get-Mailbox

Mailbox Search

Get-MailboxExportRequest

Mailbox Search

Get-MailboxExportRequestStatistics

Mailbox Search

Get-MailboxSearch

Mailbox Search

Get-Recipient

Mailbox Search

New-MailboxExportRequest

Mailbox Search

New-MailboxSearch

Mailbox Search

Remove-MailboxExportRequest

Mailbox Search

Remove-MailboxSearch

Mailbox Search

Search-Mailbox

Mailbox Search

Set-ADServerSettings

Mailbox Search

Set-MailboxExportRequest

Mailbox Search

Set-MailboxSearch

Mailbox Search

Start-MailboxSearch

Mailbox Search

Stop-MailboxSearch

Mailbox Search

Suspend-MailboxExportRequest

Mailbox Search

Write-AdminAuditLog

To output the list of Role Entries assigned to the “Mailbox Search” role, you would run:

Get-ManagementRoleEntry "Mailbox Search\*”


Assigning a Role to a Role Group:

New-ManagementRoleAssignment -SecurityGroup -Role

Role Scope: A Role Scope is essentially the scope of the rights provided to the user receiving the permissions. All Roles have a default Role Scope, so if you don’t set one, then it will be provided with the defaults. You can also create custom scopes to quickly apply to Roles when necessary.

Example of a scope:

New-ManagementScope -name "Tier 3 Technicians" -RecipientRestrictionFilter {memberofgroup -eq "cn=Executives,ou=Exec,dc=domain,dc=com"}

Role Entries: These are the tools that Roles have access to in their toolbox, limited of course by scope.

Example: Get-User and other cmdlets

Role Assignment: This is the tricky one. A Role Assignment is essentially an object that links together a Role, a Role Group, and a Role Scope into one package. Anytime you apply a Role with a Scope to a Role Group (yes even if they are defaults), you are creating a Role Assignment.

Given how many different combinations you can have, Exchange comes with around 160 Role Assignments by default according to the Exchange team!

Role Delegates: A delegate is someone who can assign the role to users/groups/etc, but they don't necessarily have the role themselves. The most common application of this is that the Organization Management role tends to have delegate rights to most roles, which means they can assign roles to users or groups, while not having the permission themselves. The auditing for this comes in at the Admin Audit Log level.

Example:

The Discovery Management role can be assigned by the Organization Management role, but members of only the Organization Management role do not have the discovery functionality by default that those belonging to the Discovery Management role have.

Conclusion

The bottom line is that people learn in different ways. If this article didn’t help you, then the EHLO blog’s explanation very good as well, but with a slightly different style that may compliment your learning style.

One thing they mention is labeling them in a way that is familiar to us:

Who: Role Group

What: Role

Where: Scope

Glue (holds it all together) : Role Assignment

For the triangle of power explanation, visit the EHLO blog:

http://msexchangeteam.com/archive/2009/11/16/453222.aspx

Outlook 2003 doesn't work with Exchange 2010


Having issues connecting to your Exchange 2010 mailbox with Outlook 2003? The issue is likely more simple that you think. In Exchange 2010 RTM, RPC encryption is turned on by default. While Outlook 2007/2010 use encryption by default, Outlook 2003 does not.

What this means for people in this situation, is that they have one of two choices:
     1. Turn on encryption in Outlook 2003.
     2. Disable encryption in Exchange 2010.

I recommend the former for security reasons, but it is fairly evident that MS has taken a different stances on this. In new deployments of Exchange 2010 SP1, RPC encryption is turn off by default. My guess is that this was to facilitate more seamless migrations for those clients moving from the 2003 realm to 2010.
Also, notice how I said “new deployments of Exchange 2010 SP1.” In an environment where Exchange 2010 RTM was deployed and upgraded to SP1, it will still be enabled by default.

Here are some quick steps to accomplishing these options:

     1. Modify Outlook to enable encryption:


2. Modify the above value with a GPO:

a. Microsoft has already done the leg work on creating an ADM file for this. (See link below)

     3. Disable encryption on Exchange 2010 SP1 Client Access Servers:
a. Set-RpcClientAccess –Server CAS1 –EncryptionRequired $False

Official TechNet article on the topic including a custom ADM file that accomplishes #2 (my recommendation).

Tuesday, January 18, 2011

Managing Large Quantities E-mail with Outlook / Exchange 2010

I am always surprised at how many people fail to use Outlook to its full potential. Here are a few tips for high mail volume individuals that should make life much easier.

Rules
Most of us use Outlook rules, but we probably don’t use them as well as we could. In the days of old, I know many people had issues running into the max size limit for their rules. This was frustrating, but is now largely avoidable with Exchange 2010. In Exchange 2010, domain-based rules can now be held on the server side (they used to only work client-side which was nearly useless for people not logged into Outlook 100% of the time), allowing us to avoid adding all those clumsy names to our rules.
Example:


Another thing about Outlook rules, is the fact that a lot of people utilize rules for sorting e-mail for initial reading. In my opinion, this is a pretty poor use of e-mail rules. Rules should be (again, in my opinion) used more for filing e-mails for retrieval at a later date, while Search Folders should be utilized for easily locating new important mail, or mail with common special criteria. This is a great way to stay on top of what is going on when you receive excessive amounts of e-mail.
If you want to find an older piece of mail in your folder structure, you should be able to remove most of the variables from the equation by where you find the e-mail, leaving only the final criteria (typically body/subject/attachment). Sure, you can Ctrl+Shift+F, but who wants to take the time to do that when your Outlook rules can logically sort them for you?
A good example of a rule to sort with a broad brush would be move all mail from people belonging to specific DL to a certain folder.

Example:


In the above example, all e-mails coming from members of the Professional Services team would be placed in the ‘Deployment’ folder. If you had a few favorite individuals to break out from there, feel free to do so in separate rules; just be sure to move that rule higher up in priority, and add the clause to stop processing more rules so that you don’t end up with duplicates!

Search Folders
I am always astonished by how few people actually know about search folders. You might be asking yourself: “What are search folders, where are they, and how do I create them?”
Search folders are essentially query folders that dynamically build based on criteria across your entire mailbox. This allows it to populate with the mail you need to read, without moving them from the desired final destination for long term retrieval and organization. Near the very bottom of your folder structure, they are hidden like diamonds in the rough:


Here are some excellent uses for search folders that will make your life easier:
    1. Unread Mail to Me (Any mail that is unread with your name on the To or CC line)
a. Mail that is sent directly to you is likely much more important to you, than e-mail sent to one of many distribution groups you may be a member of.
b. Example:


     2. All unread mail from my managers
a. You’ll want to be sure you don’t miss any e-mail on process, or requests from management.
     3. All unread mail to a specific group (Operations team, Sales team, Executive team, etc)
     4. All Unread Mail
a. A quick catch-all to avoid diving through your many, many folders.
     5. High importance e-mails
Don’t forget to pin these glorious folders to your favorites for easy access!


Monday, January 17, 2011

Discovery/Litigation with RBAC


Have you tried running the Export-Mailbox command in Exchange 2010 SP1, only to be denied? These commands were typically utilized in Exchange 2007 for purging messages with certain criteria from mailboxes en masse, or for discovery searches. Import-Mailbox and Export-Mailbox now technically require the RBAC role Mailbox Import Export according to TechNet. This role was slated to not be assigned to any role group by default in Exchange 2010 SP1 (it was assigned to the Organization Management role in RTM). The only problem with this statement is that according to PMs at MS, this command is now deprecated despite TechNet articles discussing their use.
Exchange 2010 SP1 now splits this functionality into the Search-Mailbox and New-ExportMailboxRequest cmdlets. Search-Mailbox will perform a search and subsequent export to a mailbox (including deleting the original from the source mailbox if desired). This functionality satisfies the vacuum of Export-Mailbox’s departure for tearing messages with certain criteria out of user mailboxes in bulk. The New-ExportMailboxRequest cmdlet covers the need to export data to a PST file, and both of these cmdlets can search the mailbox dumpster.
While these commands are good, they are also quite powerful, and can be more than a legal worker would require. These commands are available to a user that is added to the ‘Discovery Management’ role group, however, which is also necessary to perform discovery searches in the more conventional way (via the Exchange Control Panel). Luckily most users won’t have the know-how, nor the means (Exchange Management tools) to perform these tasks in this manner.
The Discovery Management role group encompasses the Mailbox Search and Legal Hold roles, and allows things like multi-mailbox search, as well as saving results to a secured discovery mailbox via the ECP as mentioned above. A quick recap of how to get this process rolling is to:
Add the users to the Discovery Management RBAC role group.

      Add-RoleGroupMember -Identity "Discovery Management" -Member


Create a Discovery Mailbox to act as a secure repository for search results.New-Mailbox SearchResults -Discovery -UserPrincipalName SearchMailbox@domain.com

    Instruct the users to utilize the Exchange Control Panel (ECP) to perform multi-mailbox searches, and export the results to a Discovery Mailbox.
For a legal user to access the search functionality, they need log into their ECP, and choose ‘Options’ in the upper-right hand corner, and choose ‘See All Options…’


Pull down the management options, and choose ‘My Organization’


Choose ‘Mail Control,’ and click ‘Discovery’


Enter your search criteria:


Choose the Discovery mailbox that we created earlier to place the results (or choose to let it estimate):


Check the status:


From here you can click on the ‘Open’ link on the right, or the link in the notification e-mail if you chose to have one in order to access your results.

Sunday, January 2, 2011

Exchange 2010 Move Request, Import, and Export Considerations

Given the number of new features in Exchange 2010, there are some new considerations to take into account. The first of these I will explore, as I can see it being something that my crew would find useful, is around move request, imports and exports.

Mailbox move requests and export/import requests can back up, as Exchange does not purge them automatically by default. For mailbox move requests, you can set an expiration time to whatever you like by using the following commands:

To set a 30 day automatic expiry for successful move requests:

Set-OrganizationConfig -DefaultExpirySuccessfulMR 30.0:00:00

To define that a move request does not automatically expire:

New-MoveRequest -DoesNotExpire $True

If you aren’t currently setting these to expire, you may want to consider setting this value (especially if you are performing migrations, or restructuring.

Unfortunately, I don’t believe you can manually set up expiration for Export/Import requests, however (New-Mailbox(EX/IM)portRequest is introduced in E2010 SP1). To purge these, you’d be looking at something like:

Get-MailboxImportRequest -Status Completed | Remove-MailboxImportRequest


Also, some nifty functionality was introduced around move requests as well (for those that perform mailbox moves often). You can now kick off a move that auto-suspends right before completion, and then resume them later on when the moves actually need to finalize and switch over.

To create the move request for all users in the “Seattle” office:

Get-Mailbox -Filter {Office -eq 'Seattle'} | New-MoveRequest -SuspendWhenReadyToComplete -SuspendComment 'Move Queued by Joshua on 22-Dec-2010 10:00' -BatchName ‘East Lake Users’ –BadItemLimit 1 -TargetDatabase 'DB1'

To resume the autosuspended moves to finalize the move:

Get-MoveRequest -MoveStatus 'AutoSuspended' -BatchName ‘East Lake Users’ | Resume-MoveRequest